e2 Tutorial
e2 lets you use Erlang to build better quality software in less time. This tutorial guide will walk you through an example of that process.
We’re done with “hello world” examples here – that’s way too easy. Let’s shoot for something more interesting…
A database server!
Of course, there are hundreds of ready made databases we could use “off the shelf”. Why tackle the hard problem ourselves?
Aside from the fact this is a tutorial and we’ll learn a lot, sometimes it just makes sense to build something yourself.
The build vs. buy consideration is as old as the software industry itself. The explosion of quality open source software gives us even more buy options (even if we’re not paying for licenses). Changes are good that you’ll find something on github that is close to meeting your needs.
The problem with buy options has always been that you’re taking a solution to someone else’s problem and applying it to your own. You must often adapt the off-the-shelf component to meet your needs – or, worse, adapt your needs to the software!
In this tutorial example, we’ll demonstrate how you can use Erlang to build a solution to your problem – it will contain no more or no less functionality than we need.
Problem Definition
The single most important step in software development is understanding what your problem is. In fact, that’s the real problem! Developers too often start working on a solution without having a clear idea of what they’re solving.
Let’s not make that mistake!
Of course, this is an example, so we can make up any problem and be 100% correct! But let’s at least make it sound good.
In this example, we’ll let multiple clients store and retrieve strings. We also want to perform special validation on values before they’re stored. We could use something like stored procedures in a relational database to implement this, but let’s see how far we get with something very simple and direct.
Here’s what we’re looking for:
Write values that can be subsequently read using a key
Ensure that illegal values aren’t written
Support multiple connected clients over a TCP network
Data should survive application restarts or crashes 1
With that problem sketch, let’s get started!
Setting Up e2
Note
If you’ve already setup e2 from e2 Quick Start, you can skip this
section. References to E2_HOME in this tutorial refer to the root
directory of your local e2 clone.
First, retrieve e2 from github:
$ git clone git://github.com/gar1t/e2.git
Note the e2 directory – we will refer to this as E2_HOME in examples. If
you want to copy-and-paste the examples, export the environment variable:
$ export E2_HOME=<e2 directory>
Compile e2:
$ cd $E2_HOME
$ make
Create an Empty e2 Project
From E2_HOME use the new-project make target to create a new project
skeleton. We’ll call our application “mydb” 2.
$ cd $E2_HOME
$ make new-project appid=mydb appdir=~/e2-tutorial
Compile your new project:
$ cd ~/e2-tutorial
$ make
Run your project in an Erlang shell:
$ make shell
You can leave this shell running to experiment with your application as you build it!
Developer Workflow
The most typical e2 workflow looks like this:
Use a text editor to create and modify Erlang source files
Run the
makeormake quickcommands to compile changesExperiment with your modules in the Erlang shell
The e2 makefile’s shell target runs an Erlang shell with e2_reloader
started 3. e2_reloader watches for changes in your compiled
modules and automatically reloads them. It makes iterative development very
easy!
Let’s take this workflow for a test drive!
Open the mydb.erl module and modify the stop function from this:
stop() ->
    application:stop(mydb).
to this:
stop() ->
    io:format("### stopping mydb~n"),
    application:stop(mydb).
Save you changes and compile them by running the make quick command
4:
$ make quick
This will recompile any modified modules, which in turn will be reloaded (if need be) in the shell.
Test your change in the shell:
> mydb:stop().
### stopping mydb
{error,{not_started,mydb}}
You get an error because the mydb application isn’t started. That’s okay –
this is just an illustration of developer workflow.
Here we used io:format/1 to print something to the shell – as it turns out, that’s a very useful way to debug your applications!
Let’s revert that change by deleting the io:format("### stopping mydb~n"),
line and recompiling.
Note that the change is automatically reflected in your Erlang shell:
> mydb:stop().
{error,{not_started,mydb}}
Building a Database Server - Where to Start?
Now that we have a project up and running, we can start to tackle our problem. But where do we start?
When faced with a hard problem, it’s a good idea to look for smaller problems that are easier to solve.
Without thinking at all about how the pieces should fit together, let’s jot down some information that we’re fairly certain of. We don’t need to get it all right – let’s just think out loud:
We need a way to store the key/value pairs on disk and retrieve them
We need something to listen to a TCP socket and handle client connections
Anything else?
Who cares! That’s certainly enough to get started. We could spend ages perfecting a design, or dive right in, solve easy problems by experimentation, and worry about the rest after we’ve made some progress.
Storage Engine
If we’re going to store strings values and associate them with keys, we’ll need some sort of storage engine.
While we could be really ambitious and write our own, Erlang happens to have something that we can start with – the dets module.
Take a moment to scan through the documentation on dets. This may also be a
good time to glance over the list of frequently used modules. Erlang is a language with “batteries included” and it will
help you to know what’s available.
There’s a lot of detail in the dets module – let’s sketch out what we
might need before doing a deep dive:
Write a keyed value
Retrieve a value with a key
Delete a keyed value
Manage concurrent access
The last point comes up because we want to let more than one client access the database at the same time.
Note the statement in the dets documentation:
[The] Mnesia application (or some user implemented method for locking) has to be used to implement safe concurrency.
This is good to know! We’ll need to consider this when accessing any dets
files.
Data Access API
With your editor, create the file ~/e2-tutorial/src/mydb_db.erl as follows:
-module(mydb_db).

-export([open/1, put/3, get/2, del/2]).

open(File) ->
    {todo_open_dets_file, File}.

put(Db, Key, Value) ->
    {todo_put_val, Db, Key, Value}.

get(Db, Key) ->
    {todo_read_val, Db, Key}.

del(Db, Key) ->
    {todo_delete_val, Db, Key}.
This is our basic data API. Let’s implement one function at a time.
Creating a New Data File
Looking through the documentation, it looks like dets:open_file/2 is what we need for both creating and opening an data file.
Update the open/1 function to look like this:
open(File) ->
    dets:open_file(File, []).
That sure looks simple! As it turns out – the default options for opening/creating the dets file should work for our application.
Inserting New Items
It’s looks like we want the dets:insert/2 function for adding values to a
dets file.
Modify our put/3 function to look like this:
put(Db, Key, Value) ->
    dets:insert(Db, {Key, Value}).
Also very simple!
Retrieving Items
dets provides a dizzying array of lookup functions. Fortunately, our case is
very simple – we can use dets:lookup/2.
get/2 should now look like this:
get(Db, Key) ->
    dets:lookup(Db, Key).
Deleting Items
Our last function will use dets:delete/2:
del(Db, Key) ->
    dets:delete(Db, Key).
Testing the API
Compile your changes and, assuming there are no errors, let’s try some database operations!
In your running Erlang shell:
> {ok, Db} = mydb_db:open("/tmp/test.db").
{ok,"/tmp/test.db"}
This operation should have created the file /tmp/test.db.
You can use file:read_file_info/1 within the Erlang shell to confirm.
> rr(file).
[file_descriptor,file_info]
> file:read_file_info("/tmp/test.db").
{ok,#file_info{...}}
The function rr/1 is used to load Erlang record definitions into the shell
5.
Now let’s have some fun!
> mydb_db:put(Db, "msg", "Erlang is fun!").
ok
> mydb_db:get(Db, "msg").
[{"msg","Erlang is fun!"}]
> mydb_db:del(Db, "msg").
ok
> mydb_db:get(Db, "msg").
[]
If you happened to mis-type something and get an error, you’ll notice that
subsequent uses of Db cause a strange error.
Let’s make a mistake:
> mydb_db:get(Db2, "msg").
* 1: variable 'Db2' is unbound
And correct it:
> mydb_db:get(Db, "msg").
** exception error: bad argument
     in function  dets:lookup/2
        called as dets:lookup("/tmp/test.db","msg")
This is a not-so-obvious, but very useful feature in Erlang! Alas, the details are out of scope for this tutorial.
When this happens, you can re-create the Db variable this way: 6
> {ok, Db} = mydb_db:open("/tmp/test.db").
Refining the API
So far, we have a way to store and retrieve string values!
But our API is a bit strange:
When we read our sample value, we got
[{"msg","Erlang is fun!"}]– that might make sense fordets:lookup/2but it’s a bit odd for our caseThe “missing” value was
[]– also odd
Other than that, the API looks pretty good.
Let’s fix these two oddities by applying a standard Erlang pattern: we want a way to differentiate “I have a value” from “I don’t have a value”. This is typically done using Erlang atoms as follows:
{ok, Value}Indicates that we got a value
errorIndicates that we didn’t get a value
This pattern is used by dict:find/2 7.
Let’s modify mydb_db:get/2 to use a result handler – the handler will be
responsible for translating the result from dets:lookup/2 to something more
appropriate for our case.
get(Db, Key) ->
    handle_dets_lookup(dets:lookup(Db, Key)).
And add handle_dets_lookup/1 to the module:
handle_dets_lookup([{_Key, Value}]) -> {ok, Value};
handle_dets_lookup([]) -> error.
Recompile your changes and test the new behavior:
> mydb_db:put(Db, "msg", "Erlang is elegant!").
ok
> mydb_db:get(Db, "msg").
{ok, "Erlang is elegant!"}
> mydb_db:del(Db, "msg").
ok
> mydb_db:get(Db, "msg").
error
Nice!
What About case?
We could have written get/2 this way:
get(Db, Key) ->
    case dets:lookup(Db, Key) of
        [{_Key, Value}] -> {ok, Value};
        [] -> error
    end.
Why did we use a “handler” function instead?
Any case statement can be translated into a function – and, in most cases, that’s probably the better approach. A function lets you formalize the operation. For one, you need to answer the question, “what am I going to call this silly thing?” That process alone is helpful – naming things is hard, but good names help clarify what’s going on.
You may also find the “case” worthy of a function if it becomes complex enough.
Of course, you’re perfectly free to use case statements. But you should at least feel a little guilty – you’re missing a great chance to clarify what you’re doing with a well defined function!
Client Access
Now that we have a way to store and retrieve values, wouldn’t it be nice to let clients access this great functionality?
But how?
We’ve already stated that we want clients to access our database over TCP/IP. We could, for example, run an HTTP server and provide a REST interface for clients.
But why do that? TCP isn’t that hard after all. And we can use telnet to
test!
Let’s imagine for a moment a hypothetical telnet session with our database
server, running locally on port 1234. In the sample session below, lines
preceded with “>> ” are lines you would type followed by ENTER and the rest are
lines that telnet prints. The ^ character indicates the CTRL character is
held down when typing the following character.
Again, this is only a hypothetical “what it might look like”:
$ telnet 127.0.0.1 1234
Trying 127.0.0.1...
Connected to 127.0.0.1.
Escape character is '^]'.
>> PUT msg Erlang gives you mad skills
+OK
>> GET msg
+Erlang gives you mad skills
>> DEL msg
+OK
>> GET msg
-ERROR
>> ^]
>> quit
Connection closed.
This is a rough sketch, but you get the idea:
Commands are sent on a single line (i.e. a series of bytes terminated by “\r\n”)
Results are prefixed with “+” – errors are prefixed with “-”
Database Server Stub
Let’s not think too much here – we know that we need two parts here:
Something listening on a TCP port for incoming client connections
Something to handle client connections
Each of these “somethings” maps to an e2 task. Tasks are single minded processes – they perform some work and stop, or, if need be, start the work again.
In the case of the “listener”, we want a task that binds to a local port, waits for a connection, starts a handler for that connection, and resumes the process of waiting for another connection.
In the case of the “handler”, we want a task that interacts with a client connection until that connection is closed or there’s an error.
Database Server Listener
Create the file ~/e2-tutorial/src/mydb_server.erl:
-module(mydb_server).

-behavior(e2_task).

-export([start_link/1]).

-export([init/1, handle_task/1]).

start_link(Port) ->
    e2_task:start_link(?MODULE, Port).

init(Port) ->
    {ok, listen(Port)}.

handle_task(Socket) ->
    dispatch_client(wait_for_client(Socket)),
    {repeat, Socket}.

listen(_Port) ->
    fake_listen_socket.

wait_for_client(_Socket) ->
    timer:sleep(5000),
    fake_client_socket.

dispatch_client(Client) ->
    io:format("TODO: dispatch client ~p~n", [Client]).
Whoa – that’s a lot of code!
Before we break it down, let’s try it. First, compile your changes. Then run the following in the Erlang shell:
> {ok, Server} = mydb_server:start_link(1234).
{ok, <0,XX,0>}
And… wait for it…
TODO: dispatch client fake_client_socket
TODO: dispatch client fake_client_socket
...
This will continue running, simulating the client dispatch process, until we stop it. Let’s terminate our task:
> exit(Server, shutdown).
** exception exit: shutdown
We now have a “listener” that doesn’t really listen to anything – but it does stub out the functionality we want. Let’s look more closely.
Task Behavior
We know our listener is a task because it says so:
-behavior(e2_task).
Not only does this tell us what sort of module we have, it tells the Erlang
compiler to warn us if we don’t export certain functions – in this case, we
need to export handle_task/1.
Task Exports
We took the trouble to create two lists of exports for our module:
-export([start_link/1]).

-export([init/1, handle_task/1]).
We didn’t need to do this – but it’s a common pattern in Erlang to list
public API exports separately from behavior callbacks. In our handler task,
start_link/1 is meant for public consumption, which init/1 and
handle_task/1 are callbacks that are used by e2_task 8.
Starting the Task
start_link/1 is called to start our server. It takes one argument – the
port to listen on.
As a behavior callback module, mydb_server delegates start to its
behavior module – in this case e2_task.
start_link(Port) ->
    e2_task:start_link(?MODULE, Port).
Here we provide the callback module ?MODULE, which is an alias for the
mydb_server, and the port we want to listen on. The module will be used
when calling functions like init/1 and handle_task/1. The port will be
used as an argument to init/1.
Initializing the Task
init/1 is used to listen on the specified port:
init(Port) ->
    {ok, listen(Port)}.
The init result defines the initial task state, which is used in the first
call to handle_task/1.
What’s the point of a separate init phase – why not consolidate the startup logic in the “start” function?
This is a nuanced point that gets to the heart of Erlang’s application architecture: functions are called in the context of processes. Sometimes functions are called in the context of a client process – and sometimes they’re called in the context of a server process.
It’s important to understand and recognize this distinction.
start_link/1 is called in the context of the client process. init/1 is
called in the context of the server process. A general rule in Erlang is this:
processes are black boxes – you start them and they run. All the grimy details
associated with the process are performed by the process – and die with the
process. Other processes aren’t affected.
This is a deeper topic that you’ll understand thoroughly over time. But in the
limited scope of this tutorial, understand that you want to perform any risky
or complex process initialization in init/1.
Handling Client Connections
As soon as our server is initialized, it handles incoming client connections.
handle_task(Socket) ->
    dispatch_client(wait_for_client(Socket)),
    {repeat, Socket}.
The declarative nature of Erlang makes this very clear: you handle a client connection by waiting for one, then dispatching it. Then you repeat.
Neat!
The rest of the module is “fake” – we wanted to stub this out so we can get a feel for the server behavior. The next step is to implement the missing functionality.
Listening for Clients
Servers that listen for incoming TCP connections on a particular port can use
Erlang’s gen_tcp module. Here’s the modified version of our listen/1
function:
listen(Port) ->
    {ok, Socket} = gen_tcp:listen(Port, [{reuseaddr, true}]),
    Socket.
This function will open a listen socket on the specified Port.
Refer to gen_tcp:listen/2 for more details.
Waiting for Client Connections
Once our server is listening on the specified port, it can wait for incoming
client connections using gen_tcp:accept/1. Here’s the modified version of
our wait_for_client/1 function:
wait_for_client(Socket) ->
    {ok, Client} = gen_tcp:accept(Socket),
    Client.
This function will block until a client establishes a TCP connection with our server port. It’s okay to block here – the server is a task, which means it runs in a separate process. It can happily block, waiting for connections, while other Erlang processes run free!
Testing The Server
Now that our server can listen to a port and accept incoming client connections, let’s test it!
Start a new server in your running Erlang shell: 9
> {ok, S2} = mydb_server:start_link(1234).
Note
If you made a mistake and something went wrong, don’t fear! The
easiest way to get back to a clean slate is to exit the shell by typing
CTRL-C twice and restarting it using make shell. Then re-type what
you missed above.
If everything went according to plan, you’re server is actually listening on port 1234!
Test the server using telnet:
$ telnet 127.0.0.1 1234
In your Erlang shell, note the output:
TODO: dispatch client #Port<0.XXX>
Your server is dealing with real life client connections! Only it’s not – we still have to implement that part.
Close your telnet session 10.
Client Handlers
Now that we’re accepting client connection, let’s create something to handle them!
We want another task type – we want to interact with clients until they close the connection or there’s an error.
Create the file ~/e2-tutorial/src/mydb_client_handler.erl:
-module(mydb_client_handler).

-behavior(e2_task).

-export([start_link/1]).

-export([handle_task/1, terminate/2]).

start_link(Socket) ->
    e2_task:start_link(?MODULE, Socket).

handle_task(Socket) ->
    gen_tcp:send(Socket, "hello, and goodbye!\r\n"),
    {stop, normal}.

terminate(_Reason, Socket) ->
    gen_tcp:close(Socket).
Like our initial server, this task stubs out the functionality we want. Instead of providing database services, it prints a snarky messages and closes the connection.
Using the Handler
To see this new task in action, we need to start it when we get a new client connection. It’s easy!
In mydb_server.erl, modify dispatch_client/1 as follows:
dispatch_client(Client) ->
    {ok, _} = mydb_client_handler:start_link(Client).
Compile your changes.
Now when we get a new client connection, we’ll start a task to handle it.
Before we can test this, we need to stop our running server – we left some client connections in a wait state by not closing them explicitly in our previous iteration. In the Erlang shell, stop the server this way:
> exit(S2, shutdown).
** exception exit: shutdown
Now we can start a new server:
> {ok, S3} = mydb_server:start_link(1234).
{ok,<0.XX.0>}
Let’s see what happens now when we connect using telnet:
$ telnet 127.0.0.1 1234
Trying 127.0.0.1...
Connected to 127.0.0.1.
Escape character is '^]'.
hello, and goodbye!
Connection closed by foreign host.
Well!
Client Handler Stub
So far, this process has been very iterative – we start with something small, see if it works, then enhance it until we get what we want.
In that tradition, let’s modify our client handler just enough to get a feel for a client interaction.
In mydb_client_handler.erl modify handle_task/1 as follows:
handle_task(Socket) ->
    handle_command_line(read_line(Socket), Socket).
We’re using two yet-to-be-defined functions: read_line/1 and
handle_command_line/2. This illustrates how functions can be used to
symbolically represent your problem/solution. This is a single line function
that makes it absolutely clear what it means to handle a “client task”. We
don’t yet know what it means to “handle a command line”, but we know – or more
accurately, we’re declaring – that the task is to handle a single command,
which is derived from a single line read from a socket.
Let’s define the two missing functions. First read_line/1:
read_line(Socket) ->
    inet:setopts(Socket, [{active, false}, {packet, line}]),
    gen_tcp:recv(Socket, 0).
This is standard TCP network programming: we’re setting socket options and reading some data. You can read about socket options in inet:setopts/2
Next, let’s stub out some basic command handling support in
handle_command_line/2:
handle_command_line({ok, Data}, Socket) ->
    io:format("### Got ~p from client~n", [Data]),
    {repeat, Socket};
handle_command_line({error, Err}, _Socket) ->
    {stop, {socket_err, Err}}.
This function handles two cases:
If we get data from a client, print it so we can see what it looks like
If we get an error, stop the task with an error condition (we’ll see in a moment what this looks like)
Now let’s test the behavior using telnet.
Note
Lines prefixed by >> below indicate text that you should
type, followed by ENTER. For example, when you see >> GET msg type
GET msg and then press ENTER If you don’t see >> your version of
telnet may be using a different prompt, or no problem at all. In this case,
just type what follows >> and press ENTER.
$ telnet 127.0.0.1 1234
Trying 127.0.0.1...
Connected to 127.0.0.1.
Escape character is '^]'.
>> GET msg
>> PUT msg This is a test message
>> DEL msg
>> ^]
>> quit
Connection closed.
Note what happened in your Erlang shell:
### Got "GET msg\r\n" from client
### Got "PUT msg This is a test message\r\n" from client
### Got "DEL msg\r\n" from client
>
=ERROR REPORT==== 25-Mar-2012::12:28:01 ===
** Generic server <0.45.0> terminating
...
** Reason for termination ==
** {socket_err,closed}
We can see our commands very clearly represented as Erlang strings. That should be pretty easy to handle!
When we closed the client telnet session, we got a big error. We can see that the reason for the error was that the socket was closed.
We’ll use this information in the next step to better handle these cases.
More Client Handler
Now that we know what to expect from client connections, let’s think about what sort of functionality we need:
We need to handle specific commands
To handle specific commands, we’ll need to parse the command line
We should gracefully handle the case when the socket is closed by the client – let’s just stop the task normally
Here’s the new handle_command_line/2 function:
handle_command_line({ok, Data}, Socket) ->
    handle_command(parse_command(Data), Socket);
handle_command_line({error, closed}, _Socket) ->
    {stop, normal}.
As with handle_task/2, this function is short and clearly communicates the
logic of handling a command line.
Let’s fill in some more!
Our command parsing is pretty simple. Commands look like this:
<COMMAND> SPACE <ARGUMENT> CRLF
We can use Erlang’s excellent regular expression support for this. Add the
these new functions to mydb_client_handler.erl:
parse_command(Data) ->
    handle_command_re_result(
      re:run(Data, "(.*?) (.*)\r\n", [{capture, all_but_first, list}])).

handle_command_re_result({match, [Command, Arg]}) -> {Command, Arg};
handle_command_re_result(nomatch) -> error.
For more information on the options used, see re:run/3.
Note that we again used a handler function to translate the results of
re:run/3 to something appropriate for our use. We could easily have used a
case statement – but the function more formally represents our logic.
Next, we need to handle specific commands. Based on our design sketch above, we support “GET”, “PUT” and “DEL”. Anything else is an error.
Here’s what handle_command/2 looks like:
handle_command({"GET", Key}, Socket) ->
    handle_reply(db_get(Key), Socket);
handle_command({"PUT", KeyVal}, Socket) ->
    handle_reply(db_put(split_keyval(KeyVal)), Socket);
handle_command({"DEL", Key}, Socket) ->
    handle_reply(db_del(Key), Socket);
handle_command(_, Socket) ->
    handle_reply(error, Socket).
This is the heart and soul of the task – it takes input from the user, performs the appropriate action, and routes the reply back to the user.
Note that “PUT” is slightly different from the other operations – it treats the single argument as both a key and a value.
Here’s the logic that breaks that single value into two:
split_keyval(KeyVal) ->
    handle_keyval_parts(re:split(KeyVal, " ", [{return, list}, {parts, 2}])).

handle_keyval_parts([Key]) -> {Key, ""};
handle_keyval_parts([Key, Val]) -> {Key, Val}.
Just two more parts to go!
db_xxx functions, which handle the database operations
Reply handler, which encodes our responses and sends them to the client
Here are some stubs for the database operations – we’ll figure out those details later:
db_get(Key) ->
    {ok, "You asked for " ++ Key}.

db_put({_Key, _Val}) ->
    ok.

db_del(_Key) ->
    ok.
We already have the database support – so plugging this in later will be easy!
Finally, here’s the logic for handling replies:
handle_reply(Reply, Socket) ->
    send_reply(Reply, Socket),
    {repeat, Socket}.
You’re probably sick of these short, trivial functions that use other short, trivial functions!
Let’s take a moment to review why we write code this way:
Short, trivial functions are easier to read and understand
Short, trivial functions usually solve trivial problems
Trivial problems are easy to solve!
The real problem is of course finding problems that are trivial. Most problems in software are initially hard. But by working to break the problems into smaller, integral sub problems, we can eventually get to the point we’re just solving those elusive easy ones!
That’s exactly what we’ve been doing here in building a database. By systematically thinking about concrete, solvable problems, we slowly but surely chain together trivial solutions that add up to something quite complex.
Confucius say, “Enough philosophy – let’s finish our code already!”
Here’s the last piece of our nearly finished task module:
send_reply({ok, Val}, Socket) ->
    gen_tcp:send(Socket, ["+", Val, "\r\n"]);
send_reply(ok, Socket) ->
    gen_tcp:send(Socket, "+OK\r\n");
send_reply(error, Socket) ->
    gen_tcp:send(Socket, "-ERROR\r\n").
This function handles three cases:
Sending a value
Sending an “OK”
Sending an “ERROR”
We’ve made a lot of changes in this round, so here’s the complete module as it stands currently.
-module(mydb_client_handler).

-behavior(e2_task).

-export([start_link/1]).

-export([handle_task/1, terminate/2]).

start_link(Socket) ->
    e2_task:start_link(?MODULE, Socket).

handle_task(Socket) ->
    handle_command_line(read_line(Socket), Socket).

read_line(Socket) ->
    inet:setopts(Socket, [{active, false}, {packet, line}]),
    gen_tcp:recv(Socket, 0).

handle_command_line({ok, Data}, Socket) ->
    handle_command(parse_command(Data), Socket);
handle_command_line({error, closed}, _Socket) ->
    {stop, normal}.

parse_command(Data) ->
    handle_command_re_result(
      re:run(Data, "(.*?) (.*)\r\n", [{capture, all_but_first, list}])).

handle_command_re_result({match, [Command, Arg]}) -> {Command, Arg};
handle_command_re_result(nomatch) -> error.

handle_command({"GET", Key}, Socket) ->
    handle_reply(db_get(Key), Socket);
handle_command({"PUT", KeyVal}, Socket) ->
    handle_reply(db_put(split_keyval(KeyVal)), Socket);
handle_command({"DEL", Key}, Socket) ->
    handle_reply(db_del(Key), Socket);
handle_command(_, Socket) ->
    handle_reply(error, Socket).

split_keyval(KeyVal) ->
    handle_keyval_parts(re:split(KeyVal, " ", [{return, list}, {parts, 2}])).

handle_keyval_parts([Key]) -> {Key, ""};
handle_keyval_parts([Key, Val]) -> {Key, Val}.

db_get(Key) ->
    {ok, "You asked for " ++ Key}.

db_put({_Key, _Val}) ->
    ok.

db_del(_Key) ->
    ok.

handle_reply(Reply, Socket) ->
    send_reply(Reply, Socket),
    {repeat, Socket}.

send_reply({ok, Val}, Socket) ->
    gen_tcp:send(Socket, ["+", Val, "\r\n"]);
send_reply(ok, Socket) ->
    gen_tcp:send(Socket, "+OK\r\n");
send_reply(error, Socket) ->
    gen_tcp:send(Socket, "-ERROR\r\n").

terminate(_Reason, Socket) ->
    gen_tcp:close(Socket).
Compile the changes and let’s test them with telnet.
We need to restart the server because of the error from our last test. In your running Erlang shell, run:
> {ok, S4} = mydb_server:start_link(1234).
Using telnet, let’s connect to our server and try out some commands. As
before, lines starting with >> represent commands that you type,
followed by ENTER.
$ telnet 127.0.0.1 1234
Trying 127.0.0.1...
Connected to 127.0.0.1.
Escape character is '^]'.
>> GET msg
+You asked for msg
>> PUT msg hello
+OK
>> DEL msg
+OK
>> BAD_CMD
-ERROR
>> ^]
>> quit
Connection closed.
Wow! Aside from the fact that our values aren’t stored or retrieved, this is a pretty cool database!
Data Access
Without thinking too hard about this, how would we implement the db_xxx
functions in mydb_client_handler?
Let’s grab our example code from earlier and just paste into one of the functions – just to see what it would look like:
db_get(Key) ->
    mydb_db:get(Db, Key).
That looks perfect! Except that Db isn’t defined. How are we going to solve
this? Erlang, after all, doesn’t have global variables – we can’t just write
to a shared heap and grab a reference to our database!
There are two ways to deal with this:
When a client handler process is started using
mydb_client_handler:start_link, specify a database reference as an additional argumentRun a registered database service within the application
This is a legitimate design consideration – either approach is valid and would work. Let’s think through the issues.
If we added a
Dbargument tomydb_client_handler:start_link, we’re making it slightly harder to start a handler task. Generally, in Erlang, you want to make it easier to start processes, not harder.The database file is a shared resources – if we let each task have direct access to it, we might run into concurrency related problems.
Since e2 is “service oriented”, maybe creating a separate data access service won’t be that hard. Hmmm.
Registered services are Erlang’s equivalent of singletons. This is really what we want – something that’s “just there” that we can use. Our code could then look like this:
db_get(Key) ->
    mydb_data:get(Key).
Data Server
Building services in e2 is easy.
Create the file ~/e2-tutorial/src/mydb_data.erl:
-module(mydb_data).

-behavior(e2_service).

-export([start_link/1, get/1, put/2, del/1]).

-export([init/1, handle_msg/3]).

start_link(File) ->
    e2_service:start_link(?MODULE, File, [registered]).

get(Key) ->
    e2_service:call(?MODULE, {get, Key}).

put(Key, Value) ->
    e2_service:call(?MODULE, {put, Key, Value}).

del(Key) ->
    e2_service:call(?MODULE, {del, Key}).

init(File) ->
    {ok, open_db(File)}.

open_db(File) ->
    {ok, Db} = mydb_db:open(File),
    Db.

handle_msg({get, Key}, _From, Db) ->
    {reply, mydb_db:get(Db, Key), Db};
handle_msg({put, Key, Value}, _From, Db) ->
    {reply, mydb_db:put(Db, Key, Value), Db};
handle_msg({del, Key}, _From, Db) ->
    {reply, mydb_db:del(Db, Key), Db}.
We’ll take some time to go over each part of this module in detail, but first, let’s test it!
Compile the code and start a server in your running Erlang shell:
> mydb_data:start_link("/tmp/test.db").
{ok,<0,XX,0>}
Now try some database operations:
> mydb_data:del("msg").
ok
> mydb_data:get("msg").
error
> mydb_data:put("msg", "My database is nigh!").
ok
> mydb_data:get("msg").
{ok, "My database is nigh!"}
Provided we can start this service, our client handlers can use this API
without worrying about a Db reference. This is the value of a service –
as long as it’s running, just use it!
Let’s take a moment to review this new service of ours.
Service Behavior
We know our data service is a service because it says so:
-behavior(e2_service).
As with the e2_task behavior declaration, it not only helps us understand
the type of module, it tells the Erlang compiler to check for required
functions. In this case, we need to export handle_msg/3.
Service Exports
We see here the separate listing of public functions and callback functions.
-export([start_link/1, get/1, put/2, del/1]).

-export([init/1, handle_msg/3]).
Starting the Service
The start_link function is used to start the service. It’s similar to that
of mydb_client_handler, but it applies to e2_service types, rather than
e2_task types.
Note the additional registered option provided in the third argument. This
tells e2 to register the service using its module name. This can be used to
make calls to the registered process – we’ll see how this works when we look
more closely at the public API functions below.
start_link(File) ->
    e2_service:start_link(?MODULE, File, [registered]).
Initializing the Service
Our service provides access to a single database. We open this database as a
part of the service initialization. This is what we did manually when we
experimented with the mydb_db module – we first opened a database and then
worked with that reference to test the operations.
In this case, we’ll open the database and use that value as our initial service state.
init(File) ->
    {ok, open_db(File)}.
If you recall, init/1 is called in the context of the server process –
not the process that called start_link. This is subtle, but important – if
something goes wrong during initialization, the caller of start_link won’t
be affected because of Erlang’s process isolation guarantees.
Public API
The public API is used by client of the service. These functions are called in the context of client processes – not the server process.
Each public API function looks similar:
Use
e2_service:call/2to send a message to the server process?MODULErefers to the registered service (an alias formydb_datain this case)
get(Key) ->
    e2_service:call(?MODULE, {get, Key}).

put(Key, Value) ->
    e2_service:call(?MODULE, {put, Key, Value}).

del(Key) ->
    e2_service:call(?MODULE, {del, Key}).
If we had not registered the process when we created it, we would have required an explicit process reference. Because the process is registered, we can use its registered name instead. This is how you can provide “global” or “singleton” style processes in your Erlang applications.
We’ll see later how to automatically start services when your application starts.
Handling Messages
The public API functions use e2_service:call/2 to send messages to the
registered service. The service process handles these messages in
handle_msg/3.
You can see each of the three message sent by the public API functions handled here:OB
handle_msg({get, Key}, _From, Db) ->
    {reply, mydb_db:get(Db, Key), Db};
handle_msg({put, Key, Value}, _From, Db) ->
    {reply, mydb_db:put(Db, Key, Value), Db};
handle_msg({del, Key}, _From, Db) ->
    {reply, mydb_db:del(Db, Key), Db}.
Our service “serves” access to a single database (opened in init/1 and
passed as the third argument to handle_msg/3). Each of the three
operations, get, put, and del are trivially passed along to the
mydb_db module.
Using the Data Service
We’re only moments away from connecting the dots to get a functional database!
Modify the three db_xxx functions in mydb_client_handler.erl to look
like this:
db_get(Key) ->
    mydb_data:get(Key).

db_put({Key, Val}) ->
    mydb_data:put(Key, Val).

db_del(Key) ->
    mydb_data:del(Key).
Compile your changes and get ready for some fun!
$ telnet 127.0.0.1 1234
Trying 127.0.0.1...
Connected to 127.0.0.1.
Escape character is '^]'.
>> DEL msg
+OK
>> GET msg
-ERROR
>> PUT msg It is alive!
+OK
>> GET msg
+It is alive!
>> ^]
>> quit
Connection closed.
High five!
Putting It All Together
We actually have a bona fide, multi-client, socket based database server!
But we still have some work ahead of us. To illustrate, we’re going to shut down the Erlang VM and rebuild our various services.
Shut down the Erlang shell by typing CTRL-C twice (^C ^C).
Restart the shell:
$ make shell
Let’s try to connect using our telnet client:
$ telnet 127.0.0.1 1234
Trying 127.0.0.1...
telnet: Unable to connect to remote host: Connection refused
There’s no server running! Let’s start one in the Erlang shell:
> mydb_server:start_link(1234).
Try connecting with telnet again:
$ telnet 127.0.0.1 1234
Trying 127.0.0.1...
Connected to 127.0.0.1.
Escape character is '^]'.
We’re in!
In the telnet session, “GET” a value:
>> GET msg
Connection closed by foreign host.
Something bad! Check the Erlang shell – you’ll see an error report that looks something like this:
=ERROR REPORT==== 25-Mar-2012::17:19:37 ===
** Generic server <0.38.0> terminating
...
** exception error: {noproc,
                      {gen_server,call,
                         [mydb_data,{'$call',{get,"msg"}},infinity]}}
This is fancy Erlang speak for “the process you tried to call wasn’t running!”
The problem is that our client handler relies on mydb_data to be
started. But we never started it!
That’s the nature of service oriented design – to use a service, it must be running. If it’s not running, you can’t use it.
Let’s fix this by stating the data service. In the Erlang shell, run:
> mydb_data:start_link("/tmp/data.db").
We also have to start our server again, because it crashed when the handler crashed. In the Erlang shell:
> mydb_server:start_link(1234).
Now connect again with telnet and experiment with the socket protocol.
It works!
But if only there was a way to do all this startup work automatically.
Application Startup
In your editor, open the file ~/e2-tutorial/src/mydb_app.erl.
This file was created automatically when you created the mydb project.
It even has a little TODO note for you!
The purpose of this module is to list top-level processes that are started when the application starts. Perfect!
Modify the file to look like this:
-module(mydb_app).

-behavior(e2_application).

-export([init/0]).

init() ->
    {ok, [{mydb_data, start_link, ["/tmp/data.db"]},
          {mydb_server, start_link, [1234]}
         ]}.
This tells e2, when you start the mydb application, make sure that
mydb_server and mydb_data are started.
Compile you changes and let’s test!
Shut down Erlang by typing CTRL-C twice.
Restart it:
$ make shell
In the Erlang shell, start mydb:
> mydb:start().
ok
Now test the database server using telnet.
You can also execute mydb:stop(). to stop the database and confirm that the
server is no longer running.
Application Configuration
Our database is looking great! But we have a problem – we hard coded some
settings in mydb_app:
The database file is “/tmp/test.db”
The server port is 1234
Those values are fine for testing, but we need to support external configuration to let database administrators setup the database on differently.
Replace the hard coded port and file name in mydb_app:init/0 with some
functions – we can use these to lookup the values:
init() ->
    {ok, [{mydb_data, start_link, [db_file()]},
          {mydb_server, start_link, [server_port()]}
         ]}.
Next, add the two functions – these in turn lookup application configuration:
db_file() ->
    app_config(db_file, ?DEFAULT_DB_FILE).

server_port() ->
    app_config(server_port, ?DEFAULT_PORT).
?DEFAULT_DB_FILE and ?DEFAULT_SERVER_PORT are references to macros –
it’s a good idea to use macros for this type of information because it calls
attention to their “hard coding”.
Here are their definitions – you can put them just under the export list
at the top of the module:
-define(DEFAULT_DB_FILE, "/var/lib/mydb/data.db").
-define(DEFAULT_PORT, 1234).
Finally, here’s the application configuration lookup support:
app_config(Name, Default) ->
    handle_app_env(application:get_env(Name), Default).

handle_app_env({ok, Value}, _Default) -> Value;
handle_app_env(undefined, Default) -> Default.
application:get_env/1 is used to lookup a configuration value for the
current application. We’ll show how this is used shortly. Refer to
application:get_env/1 for more details.
Here’s the complete mydb_app module:
-module(mydb_app).

-behavior(e2_application).

-export([init/0]).

-define(DEFAULT_DB_FILE, "/var/lib/mydb/data.db").
-define(DEFAULT_PORT, 1234).

init() ->
    {ok, [{mydb_data, start_link, [db_file()]},
          {mydb_server, start_link, [server_port()]}
         ]}.

db_file() ->
    app_config(db_file, ?DEFAULT_DB_FILE).

server_port() ->
    app_config(server_port, ?DEFAULT_PORT).

app_config(Name, Default) ->
    handle_app_env(application:get_env(Name), Default).

handle_app_env({ok, Value}, _Default) -> Value;
handle_app_env(undefined, Default) -> Default.
Config Files
Now that our application reads application configuration for the server port and database file, let’s start our application with some custom settings.
Create the file ~/e2-tutorial/test.config as follows:
[{mydb, [{server_port, 2222}, {db_file, "test.db"}]}].
This is how application configuration is specified. In this case, mydb has
a list of two properties: server_port and db_file.
Save the file and quit the Erlang shell.
Start the Erlang shell again, but this time, specify some additional options that will tell the Erlang VM to read your new configuration:
$ make opts="-config test" shell
In the Erlang shell, start mydb:
> mydb:start().
Not, try connecting to the original port – 1234 – using telnet:
$ telnet 127.0.0.1 1234
Trying 127.0.0.1...
telnet: Unable to connect to remote host: Connection refused
That’s good news! The server should be running on port 2222 – that’s what’s in
the test.config. Let’s try again, this time with the correct port:
$ telnet 127.0.0.1 2222
Trying 127.0.0.1...
Connected to 127.0.0.1.
Fault Tolerance
We’re almost done!
But before we claim victory, let’s put Erlang’s famed “fault tolerance” to the test.
As we’ll soon see, there’s a serious design flaw in our application!
With your database server running, connect to it with two different telnet
sessions. Each session should see the changes made by the other. Try it!
Next, start the appmon application from the Erlang shell:
> appmon:start().
This will bring up a graphical application that shows looks something like this:
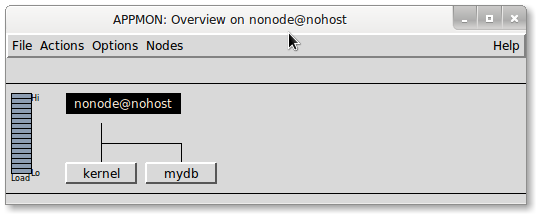
Click on the mydb button.
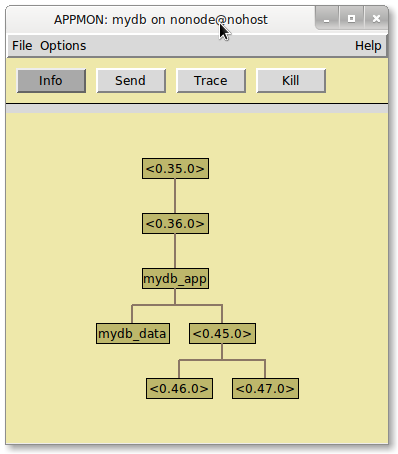
This will open a new window, which displayed a tree of running processes:
Note
The process IDs (i.e. the values that look like <0.XX.0>) may be
different in your appmon windows.
Looking at the mydb_app node, we can see two children: mydb_data and an
unregistered service (process ID <0.45.0> in the example above). These
correspond to the top-level processes specified in mydb_app.
The unregistered process (i.e. <0.45.0> above) is the mydb_server task
that is listening on port 2222. It’s two children are the client handlers that
are servicing your two telnet sessions.
We can use appmon to kill one of the two telnet handlers. If our
application is well designed – only one telnet session will be affected.
Let’s try it! Click Kill in the process window and click on one of the two
client handler processes (e.g. either <0.46.0> or <0.47.0> above).
What happened?
Rats! Both telnet sessions were closed! That’s not fault tolerant – it’s
fault intolerant!
This is the problem: the start_link functions that we’ve been using to
start processes create links between the starting process and the new
process. When two processes are linked, when one process terminates abnormally,
the other terminates 11.
In our case, the mydb_server task links to handler tasks. If any
handler task terminates abnormally, the server will terminate, along with every
other handler task! It’s a cascading mess!
This is the design flaw: processes should not typically start other processes. Instead, they should call specialized start functions on supervisors. New processes are then linked to their supervisors, which specialize in dealing with process termination.
Client Handler Supervisor
Let’s fix this problem using a supervisor. Here’s what we want to do:
Create supervisor that specializes in starting and supervising
mydb_client_handlertasksStart that supervisor as a top-level process for our app
Modify
mydb_serverto use the new supervisor to start client handlers, rather than start them itself
Create a new file ~/e2-tutorial/src/mydb_client_handler_sup.erl that looks
like this:
-module(mydb_client_handler_sup).

-behavior(e2_task_supervisor).

-export([start_link/0, start_handler/1]).

start_link() ->
    e2_task_supervisor:start_link(?MODULE, mydb_client_handler, [registered]).

start_handler(Socket) ->
    e2_task_supervisor:start_task(?MODULE, [Socket]).
start_link/0 starts an e2_task_supervisor:
The first argument is the supervisor callback module
The second argument is the task module
mydb_client_handler– the supervisor will start tasks using this module’sstart_linkfunctionThe third argument is a list of options containing
registered– likemydb_datathis will registered a single named process that can be referenced usingmydb_client_handler_sup
start_handler/1 starts a new handler, which will be supervised by the
task supervisor. The default behavior of task supervisors is to not restart
children, regardless of how they terminate. This is what we want in this case
(restarting with the original client socket would not be the right course in
many cases).
The first argument to
e2_task_supervisor:start_task/2is the supervisor referenceThe second argument is the list of arguments to pass to the task module’s
start_linkfunction – in this case, we’re starting the new client handler with the client socket as the single argument
With our new task supervisor ready, let’s ensure that it’s available when the application is started.
Modify mydb_app:init/0 to look like this:
init() ->
    {ok, [{mydb_data, start_link, [db_file()]},
          {mydb_client_handler_sup, [supervisor]},
          {mydb_server, start_link, [server_port()]}
         ]}.
The order the processes are listed in is important because it determines the
order in which the processes are started. In this case, we want to make sure
both mydb_data and mydb_client_handler_sup are available before we
start accepting client connections with mydb_server.
Finally, let’s modify mydb_server:dispatch_client/1 to use the supervisor
instead of starting the client handler itself:
dispatch_client(Client) ->
    {ok, _} = mydb_client_handler_sup:start_handler(Client).
Actual Fault Tolerance
Now that we’ve fixed our fault intolerance problem, let’s run our test again:
Close the Erlang shell
Start the Erlang shell using this command (this will automatically start
mydb):$ make opts="-config test -s mydb" shell
Connect the server on port 2222 using two separate
telnetclientsStart
appmonin the Erlang shell:> appmon:start().
Click the mydb button in the top-level
appmonwindow
You should now see this hierarchy:
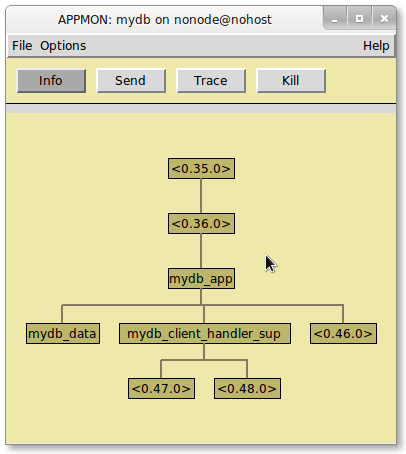
Note that now the two client handler processes are children of
mydb_client_handler_sup. This is what you want to see in your Erlang
process hierarchies – a relatively flat structure with all processes running
under a supervisor.
Click Kill and then click one of the two client handler processes
(e.g. <0.47.0> or <0.48.0> above). Note now that only the related
telnet session is effected – the other session is still running!
Now that’s actual fault tolerance!
Wrapping Up
Believe it or not, we just created a serviceable multi-user, socket based database in just over 130 lines of code!
Seriously – that just happened!
But more importantly, you know a lot about writing quality Erlang using e2:
Erlang code is organized in :doc_`applications <applications>` – yours is called
mydbe2 tasks are used to perform work
e2 services are used to provide functionality to client in your app
You can assemble tasks services together to write complex software
Supervisors are used to manage processes
You even got a taste of Erlang coding style:
Functions should be short and focused, solving small, trivial problems
Complex functionality can be broken into smaller, simpler pieces
You don’t need to approach complex systems with an over arching design – you can take it step by step, solving obvious problems, and eventually end up with something that works very well
What We Didn’t Cover
Data Validation
Wait a minute! We’re not performing any of that special validation we talked about earlier! That was the whole point of writing our own database for crying out loud!
This is coming soon.
Here’s what’s planned:
Modify
mydb_datato enforce our custom validation, returning{error, Msg}on an invalidputModify
mydb_client_handlerto handle{error, Msg}results, which sends the result to the client ala “-ERROR invalid value” on an invalid “PUT”
You can try it now, if you’re dare!
Cheats…
send_reply({error, Msg}, Socket) ->
    gen_tcp:send(Socket, ["-ERROR ", Msg, "\r\n"]);
handle_msg({put, Key, Value}, _From, Db) ->
    handle_validate_put(validate_put(Value), Key, Db);
validate_put(Value) ->
    validate_length(length(Value), Value).

validate_length(Len, Value) when Len >= 3 -> {true, Value};
validate_length(_, _) -> false.

handle_validate_put({true, Value}, Key, Db) ->
    {reply, mydb_db:put(Db, Key, Value), Db};
handle_validate_put(false, _Key, Db) ->
    {reply, {error, "invalid value"}, Db}.
Application Packaging
We haven’t covered what’s involved in packaging and deploying your application. We’ll update this tutorial once that’s been sorted out!
In the mean time, you can deploy the source code to the application and run this command to build it:
$ make
You can run this command to run the application as a daemon:
$ config=test ./start
This will use the local test.config for the application configuration. If
you wanted to use different settings – e.g. production.config – you’d
create that file and use this to start the application:
$ config=production ./start
You can check the status of the application this way:
$ ./status
You can stop the application this way:
$ ./stop
And you can check the application logs by looking in the log directory!
Next Steps
This of course is an introductory tutorial, so there’s a lot left out! Stay tuned to e2project.org for new tutorials, examples, and what not!
Footnotes
- 1
Database “durability” of of course a very difficult problem – but we’ll do our best!
- 2
mydbis the name of the Erlang application name. Application names are typically used to prefix every module in the application, and should be short but descriptive.- 3
e2_reloaderis merely a renamed version of the Mochiwebreloadermodule.- 4
The default
maketarget compiles your project code along with all of its dependencies. Thequicktarget skips these dependencies, which will save you time during normal development.- 5
This isn’t strictly necessary for this example, but it makes it easier to read the record returned by
file:read_file_info/2.- 6
Seasoned Erlangers might at first blance at this assignment – it looks like we’re reassigning a variable, which in Erlang is a no-no. But in fact, you can’t redefine a variable – and in this case
Dbis always thedetstable name “/tmp/test.db”.- 7
Erlang has a number of inconsistencies in the implementation of its APIs. Don’t be surprised to see wildly differing function names and return value conventions in the core modules!
- 8
If you’re used to Java, callbacks are similar to
abstract protectedmethods that are called by super classes and implemented by concrete subclasseses.- 9
Here’s a case where we can’t reuse the same variable in Erlang. Our previous server was named
Serverand was a process ID. Subsequent process IDs will be different, so if we tried to assign the new server to{ok, Server}we’d get a bad match! Try it if you want.- 10
You typically close telnet by issuing the telnet escape character (e.g.
^]+ENTER) and typingquit+ENTER.- 11
Linked processes can guard against termination by “trapping” exits – but isn’t how we’re going to solve this particular problem.
